
Best Hand Grinder for Espresso Under 100 (2026): 5 Picks
If you want the best hand grinder for espresso under 100, the trick is avoiding grinders that look fancy but feel sloppy once you start dialing shots. Espresso is picky. If your grinder can’t make small, repeatable changes, you’ll burn through beans chasing a good shot.
I picked these five by comparing burr type, adjustment feel, grind effort, and how annoying they feel in a real morning routine. No hype. Just the stuff that makes espresso easier (or harder) when you’re trying to stay under $100.
One more reality check: hand grinding espresso is work. Not “ruin your day” work, but enough that you’ll notice it. Think pepper mill vibes, but longer. If that sounds miserable, you might want to look at small electrics or step up in budget. If you’re okay with a little ritual, a good hand grinder can be a shockingly smart way to get better espresso without spending a fortune.
Hand espresso grinders under $100 that actually make sense
Picked for shot control, daily annoyance level, and how painful the grind feels before your first sip
Overall
Best espresso control under $100
- More dial-in control
- Solid build feel
- Good espresso range
- Best all-around value
Top Pick KINGrinder K6
$$
The easiest “serious” pick under $100
Check Price on Amazon Beginner
Low-stress daily workflow
- Easy to live with
- Simple adjustments
- Compact and tidy
- Great first hand grinder
Top Pick 1Zpresso Q Air
$$
Smooth, simple, and forgiving
Check Price on Amazon Budget
Best value if you’re watching the wallet
- Good value
- Wide availability
- Nice for filter too
- Better than “random cheap”
Top Pick TIMEMORE Chestnut C2
$
Best bang-for-buck starter
Check Price on Amazon Travel
Best for espresso-ish coffee on the road
- Light packing
- Easy cleanup
- Simple operation
- Good as a backup
Top Pick Hario Smart G Pro
$
A practical suitcase grinder
Check Price on AmazonQuick answer
Quick answer: If you want the most espresso control under $100, start with the KINGrinder K6. If you want the easiest daily routine, go 1Zpresso Q Air. If you’re keeping things simple (or using a pressurized basket), the TIMEMORE Chestnut C2 is the best value.
- Best overall: KINGrinder K6 — the most “espresso-friendly” feel here.
- Most beginner friendly: 1Zpresso Q Air — smooth, simple, low drama.
- Best value: TIMEMORE Chestnut C2 — great upgrade from a blade grinder.
- Best travel/backup: Hario Smart G Pro — practical if it lives in a bag.
- Cheapest backup: JavaPresse Manual Coffee Grinder — works, but keep expectations realistic.
If you’re unsure whether your basket is pressurized or non-pressurized, don’t stress. I explain the difference in the buying guide below, because it changes what “good enough” looks like.
Quick picks
Our Top Picks


Comparison table
| Product | Best for | Typical price | Burrs | Adjustment feel | Espresso fit | |
|---|---|---|---|---|---|---|
| KINGrinder K6 | Best overall espresso control under $100 | $89-$99 | Steel burrs | More precise, easier to dial in | Best choice here for tighter shot control | Check price |
| 1Zpresso Q Air | Best easy daily workflow | $69-$89 | Steel burrs | Easy and beginner friendly | Great for learning; tight espresso can be trickier | Check price |
| TIMEMORE Chestnut C2 | Best value for pressurized-basket espresso | $45-$69 | Steel burrs | Works, but less fine-grained for espresso | Best with pressurized baskets and flexible expectations | Check price |
| Hario Smart G Pro | Best travel-focused option | $54-$64 | Steel burrs | Simple, but not the tightest espresso control | Great travel/backup; not my first pick for daily espresso | Check price |
| JavaPresse Manual Coffee Grinder | Best ultra-low-cost backup | $26-$35 | Ceramic burrs | Coarser, harder to fine-tune | Okay as a cheap backup; not ideal for dialing espresso | Check price |
How we evaluate
For this roundup, we researched each grinder using current listings, maker info when available, and the patterns you see over and over in buyer feedback. We focused on espresso reality: how easy it is to make small adjustments, whether the grinder feels stable and consistent, and how much effort it takes to get through a dose before your coffee gets cold.
The big idea is simple. Espresso is like tuning a radio. If the knob jumps from one station to the next, you can’t land on the sweet spot. A grinder that lets you nudge the grind a little at a time is usually more useful than one that looks fancy but feels unpredictable.
We also care about “daily annoyance.” A grinder can make a decent cup, but if it’s slow, messy, or constantly frustrating to adjust, you’ll stop using it. The best pick is the one you’ll actually want to use on a sleepy Tuesday.
Finally, we separate two very different use cases:
- Pressurized basket espresso: more forgiving. Your grinder can be “pretty good” and you’ll still get tasty coffee.
- Non-pressurized basket espresso: not forgiving. Your grinder needs tighter control, or you’ll taste it fast.
If you want the deeper nerdy stuff (without the lab-report vibe), our burr grinder settings for espresso guide explains how grind changes show up in taste.
Individual product reviews
1) KINGrinder K6 - Best overall under $100
If your goal is espresso that tastes sweet and balanced (not sour one day, bitter the next), this is the pick I’d start with. The K6 is one of the few sub-$100 hand grinders that feels like it’s actually trying to help you dial in, instead of making you guess.
Here’s what “good dial-in control” feels like in real life. You grind a shot. It runs too fast. You tighten the grind a notch. The next shot slows down and tastes less sour. That cause-and-effect is the whole game. With cheaper grinders, you often don’t get that clean feedback. You twist the adjustment and it’s like the coffee ignores you.
The K6 also tends to feel more stable when you change beans. That’s important because different coffees grind differently. A grinder that acts like a different machine every time you open a new bag is a fast track to frustration.
The downside is obvious: it’s still a hand grinder. If you drink light roasts (the super dense, hard beans), it can feel like an arm workout. But if you’re choosing manual on purpose, this is the kind of grinder that makes the work feel worth it.
Pros
- ✓ Best dial-in control in this price range.
- ✓ Good pick if you want to grow into non-pressurized espresso.
- ✓ Feels solid and confidence-inspiring for daily use.
Cons
- ✗ Near the top of the budget cap.
- ✗ Grinding espresso-fine can be tiring, especially for multiple drinks.
2) 1Zpresso Q Air - Best beginner-friendly workflow
This is the “I just want good coffee without a whole hobby project” option. The Q Air is compact, easy to handle, and generally low drama. That matters more than people admit.
For espresso, it’s a great learning tool. You can build a consistent routine, learn what “too fine” and “too coarse” taste like, and get repeatable results without feeling like you need a spreadsheet.
If you’ve never dialed in espresso before, here’s the vibe: you’re trying to get a shot that tastes like caramel and chocolate, not lemon water. When the grinder is cooperative, you get there in a few tries. When the grinder is not cooperative, you keep changing things and you never know what actually fixed it.
The trade-off is that you don’t always get ultra-tiny steps between settings. If you’re chasing very tight non-pressurized shots, you may want the K6 instead. But for most people under $100, the Q Air is a smart, friendly daily driver.
Pros
- ✓ Easy to use, easy to adjust, easy to keep clean.
- ✓ Great choice if you brew more than one method.
- ✓ Compact size is a huge quality-of-life win.
Cons
- ✗ Not the tightest dial-in control for demanding espresso setups.
- ✗ Smaller capacity can add a refill step for bigger drinks.
3) TIMEMORE Chestnut C2 - Best budget value
The C2 is the safe value pick. It’s the one you recommend to a friend who’s currently using a blade grinder and making coffee that tastes like “burnt and angry.” This is a real upgrade without spending a lot.
If you’re using a pressurized basket, the C2 is often enough to make espresso drinks you’ll be happy with. You can pull something chocolatey and smooth, especially with medium roasts. If you’re using a non-pressurized basket, you can still get decent shots, but you may notice the dial-in steps feel a little chunky.
The best way to use this grinder for espresso is to keep your routine consistent. Same dose. Same basket. Same tamp pressure. Then change only the grind setting when you want to improve a shot. That consistency makes a budget grinder behave better.
The C2 also shines if you brew more than espresso. It’s a nice “one grinder, multiple brews” pick. And if you ever decide you want to upgrade to a dedicated espresso grinder later, it can still stay useful for AeroPress, pour-over, or travel.
Pros
- ✓ Strong value and widely available.
- ✓ Great jump up from a blade grinder.
- ✓ Nice all-around pick if you brew more than espresso.
Cons
- ✗ Less fine control for tight espresso dialing.
- ✗ Not my first pick if you’re serious about non-pressurized baskets.
4) Hario Smart G Pro - Best travel pick
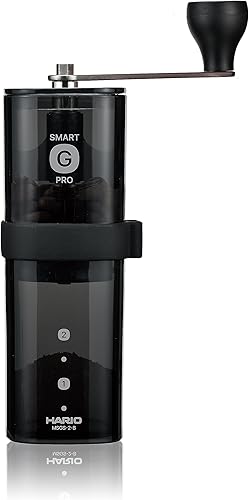
If this grinder lives in a suitcase, a backpack, or a “just in case” drawer, it makes a lot of sense. It’s light, simple, and practical. That’s exactly what you want for travel coffee.
The big win is convenience. You don’t want a travel grinder that needs a careful ritual to use. You want something you can grind with half-awake, rinse quickly, and move on.
For daily home espresso, it’s not my top choice. The adjustment feel is more “good enough” than “laser precise.” You can still make enjoyable coffee, but it may take more fiddling to land the exact shot you want.
Think of it like a compact travel toothbrush. It’s not the fanciest thing in your bathroom. But when you need it, you’re glad it’s there.
Pros
- ✓ Great as a travel grinder or backup.
- ✓ Simple, light, and easy to pack.
- ✓ Widely available.
Cons
- ✗ Not the best choice for tight espresso dialing.
- ✗ Can feel slower at espresso-fine settings.
5) JavaPresse Manual Coffee Grinder - Best ultra-cheap backup

I’m including JavaPresse Manual Coffee Grinder for one reason: sometimes the budget is the budget. If you need a burr grinder right now and you can’t spend more, this can get you started.
But here’s the honest part. It’s not the tool I’d pick for serious espresso. The adjustment is harder to fine-tune, and your results can feel more hit-or-miss. It works better as a backup grinder, or as a “get me through this month” choice.
If you’re trying to get repeatable espresso with a non-pressurized basket, I’d rather see you save a bit and buy one of the steel-burr options above. You’ll waste less coffee and you’ll have more fun.
If you do buy it, my advice is simple: don’t chase perfection. Use it for milk drinks or pressurized-basket espresso, keep it clean, and treat it like a stepping stone.
Pros
- ✓ Very low cost for a burr-style manual grinder.
- ✓ Compact and easy to stash as a backup.
Cons
- ✗ Harder to dial in espresso consistently.
- ✗ Grinding can feel slow and tiring.
- ✗ Not a long-term espresso pick.
Which pick should you buy?
If you’re still stuck, here’s the simplest decision tree.
- You want non-pressurized espresso and you hate wasting beans: start with KINGrinder K6.
- You want a smooth daily routine and you’re still learning: pick 1Zpresso Q Air.
- You’re using a pressurized basket and you want the best value: go TIMEMORE Chestnut C2.
- You want a travel or backup grinder: Hario Smart G Pro.
- You just need the cheapest burr grinder now: JavaPresse Manual Coffee Grinder.
How to dial in espresso without wasting a whole bag
If you’re new to espresso, here’s the part nobody says out loud: your grinder isn’t the only thing changing. Your beans change. Your puck prep (that’s just how you load and tamp the grounds) changes. Even your mood changes. So you need a simple loop that keeps you sane.
A simple dial-in loop for budget hand grinders
Keep it boring. Boring is how you get good espresso consistently.
Step 1 Set a starting point
- Pick one dose size and stick to it
- Use the same basket every time
- Start in the middle of your espresso range
Step 2 Change one thing
- Pull a shot
- Taste it
- Adjust grind one step only
- Repeat once
Step 3 Lock it in
- Write down your setting
- Brush out the grinder weekly
- Re-check after bean changes
Result
Less guesswork, fewer wasted shots, and espresso that tastes like coffee (not a science experiment)
If you want a deeper walkthrough, check our espresso shot dial-in workflow and our burr grinder settings guide. They’ll help you connect what you’re tasting to what to change.
What if you decide you’re done with hand grinding?
That’s normal. Hand grinding espresso can be a fun ritual, but it can also become a chore if you’re making multiple drinks a day. If you start feeling that “I hate this” vibe, don’t blame yourself. It’s just the wrong tool for your routine.
If you’re ready to upgrade, start with our best burr grinder for espresso roundup. Even moving to an entry-level electric can make espresso feel calmer and more repeatable.
Frequently asked questions
Can a hand grinder under $100 do real espresso with a non-pressurized basket?
Sometimes. In this price range, “real espresso” is less about hype and more about dial-in control. If your grinder makes small, repeatable changes, you’ll have a much easier time landing a balanced shot. If one click swings your shot from sour to bitter, you’ll fight it forever.
Is a manual grinder better than a cheap electric grinder for espresso?
At the same price, manual grinders often give you better burr quality and more consistent grinds. The trade-off is time and arm effort. If you make one drink a day, it’s usually worth it. If you make four, you’ll start dreaming about an electric upgrade.
What’s the main mistake people make when buying a budget hand espresso grinder?
Buying for “features” instead of for control. For espresso, the adjustment feel matters more than fancy claims. If the grinder can’t make small changes that you can repeat tomorrow, you’ll waste beans and get frustrated fast.
Do I need steel burrs for espresso under $100?
Steel burrs are usually the safer bet in this budget because they tend to grind faster and feel more consistent at espresso-fine settings. Ceramic burr grinders can still make coffee, but they’re usually a tougher path for repeatable espresso dialing.
How often should I clean a hand grinder used for espresso?
Quick brush-out weekly is a great habit. Then do a deeper clean every few weeks (or sooner if your coffee starts tasting muddy). Espresso fines build up, and you can taste it even if you don’t see it.